DIY Easter Eggs Bath Bombs: Make & Paint-It-Yourself
Wondering what to do this Easter especially with kids being home? Looking for some interesting ideas to make this Easter special without venturing out much? This easy DIY Easter Egg Bath Bombs can be your perfect answer! Arrange a scavenger hunt or put them in a surprise gift basket, these will thrill your kids!
Surprise your kids with a Gift Basket by adding some snacks, bath toys, soft toys and whatever they love! Easy to assemble and will make your kids’ Easter special! Add a small PAINT-IT-YOURSELF KIT to make it more interesting!! HOW?? READ ON!!
Ingredients- Makes about 4-5 Bath Bombs
Dry Ingredients:
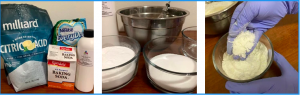
1 Cup Baking Soda
1/2 Cup Citric Acid
1 tbsp Milk Powder
1 tbsp Epsom Salt (Optional)
Wet Ingredients:
2 tbsp Oil (Olive, Almond, Coconut)
7-10 drops of skin-safe Essential Oil (Lavender, Rose or even Cotton Candy)
1/2 tbsp of Water
4-5 Egg Toys/Molds
Paint-It-Yourself Kit:
Some disposable cups
1-2 tbsp any Oil
Food Color(s)
Directions:
- In a bowl, mix together baking soda, citric acid, milk powder and epsom salt (All your dry ingredients). Whisk gently. Make sure to mix well so that all the ingredients are blended well together.
- In a separate bowl, mix 2 tbsp of oil (make sure it’s melted if using coconut), 6-7 drops of essential oil and 1/2 tbsp of water (5-6 drops). Your wet mix is ready.
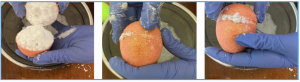
- Using a spoon put a LITTLE AMOUNT of wet mix in your dry mixture. It would slightly activate your mixture but don’t worry. Gently mix all the ingredients with your hands. Put another small amount of liquid in the mixture and again mix gently. Keep repeating the process until you get the right consistency. Your mixture should form clumps when pressed gently. That’s when you know it’s time to fill the molds.
- Fill your egg molds (don’t pack too tight) and close the mold firmly making sure that everything stays tight. For additional fun you can also put a toy inside.
- Let the bath bombs dry, for about 1-2 hours, before attempting to take them out of the molds. To help loosen them, tap on the mold a bit with a metal spoon. Let them air dry for 48 hours.
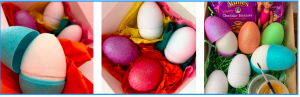
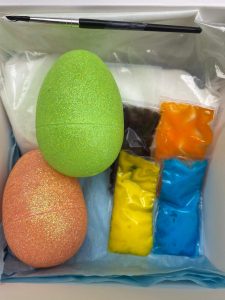
PAINT-IT-YOURSELF KIT
If you want to make it more fun, let your kids paint them. To prepare the paint, in a separate bowl(s), put 1/4 tbsp of oil and add a colorant to it. You can prepare 2-3 types of different colorants if you want to make colorful bath bombs.
(I made red, yellow, orange, and blue) and let your kids color these eggies.
So, who’s ready for some colors and splashes this Easter? Staying home doesn’t need to be boring, right? Share your comments, pictures, feedback and love on Instagram @SpellBathing. Let’s stand as a stronger community!
Order Online: You can also order online. The kits will be delivered at your doorstep on Thurs between 12:00 PM to 6:00 PM. Send a PM on Instagram or Facebook on ‘SpellBathing’. You can also email us at [email protected].
About the Author:
Aishwarya has been making Bath and Body products for 3 years now. Inspired by her Grandmother’s recipes, she adds skin benefitting natural ingredients in her products! She loves making things- Soaps, Body Butters, Bath Bombs, Salt Soaks, Lip Balms….on and on…She is on a journey to ditch “Mass-Produced Chemicals called Cosmetics” filled in plastic bottles! Are you coming along?
Follow ‘SpellBathing’ on Instagram and Facebook. DM for any questions, suggestions and love![/vc_column_text][/vc_column][/vc_row]